

Hi everyone! It’s Lynda Kanase from i-crafter here on the Notions blog with a mixed media, Zip Gift Tag project featuring painting with our i-Brush Blender Brushes and some easy doodling!
Try these four different techniques to make lots of Zip Gift Tags for gift giving or beautiful art projects.
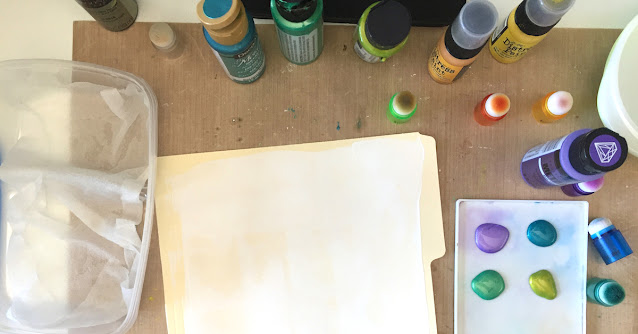
SUPPLIES by i-crafter
ADDITIONAL MATERIALS:
- Die cutting machine
- Manila folders – One folder can make up to 8 tags
- Gesso paint
- Acrylic paint in various colors {We used DecoArt Metallic Teal, Folk Art Metallic Amethyst, Folk Art Color Shift Emerald Flash, Folk Art Color Shift Green Flash and Ranger Distress Paint Mustard Seed}
- Cardstock in colors to coordinate with the acrylic paints
- Clear Acrylic glaze {We used Folk Art Dragonfly Glaze}
- Opaque White Marker {We used Sakura Pen-touch Opaque White Marker 0.7mm Extra Fine Point}
- Adhesives: Liquid
- Paint palette
- Plastic bowl with lid, lined with a wet paper towel
- Water spritzer bottle
- Old gift card
- Covering to protect your work surface from paint
INSTRUCTIONS:
PAINTING
1. Cut several manila folders in half along the fold. Place on a covered surface to protect work surface from paint. Apply gesso in a line along one side. Use an old gift card to drag the gesso across the manila folder to create a smooth surface.

Repeat on as many of the manila folders as needed. Dry completely.
2. Gather your acrylic paints, i-Brush Blender Brushes, paint palette and a plastic bowl lined with a wet paper towel. The i-Brush Blender Brushes are more durable to handle painting with acrylic paints. Make sure that the acrylic paint does not dry on your i-Brush Blender Brushes by placing them in a plastic bowl on a wet paper towel between applications. When finished, be sure to wash your i-Brush Blender Brushes well.
If you are going to stop for an extended amount of time, wash your i-Brushes and lay flat to dry.
3. Blended Dot Technique, begin applying short strokes of one color of acrylic paint along the top of a gesso base using an i-Brush Blender Brush. Working quickly, blend in the next color. Apply clear glaze to help blend colors. Continue blending additional colors until the entire front of the gesso base {manila sheet coated with gesso} is covered. Apply random short brush strokes across the background. Set aside to dry completely.

4. Stencil Technique: begin by placing stencils on the gesso base. Using the old gift card again, apply another layer of gesso through the stencils to create a raised pattern. Remove the stencils and wash immediately. Set aside the gesso base to dry completely. After the gesso base is dried, apply acrylic paint, randomly blending colors or follow the stencil pattern.


6. Water Blend Technique: Using a spritzer, apply a generous amount of water to a gesso base. Use the i-Brush Blender Brush to apply paint to the one edge. Tilt the gesso base and spritz with more water allowing the paint to run and bleed together. Continue to add paint and water until the colors flow nicely.

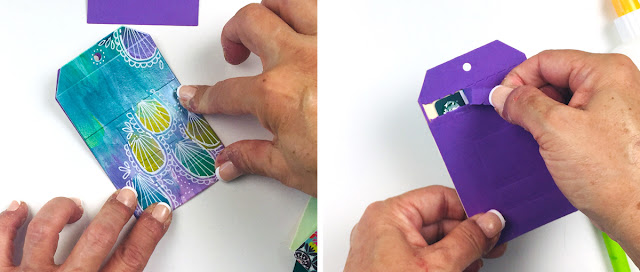
7. Once all of the gesso bases are completely dry, trim to fit into a die cutting machine. For the front of the tags, use the Zip Gift Tag die without the zip insert.


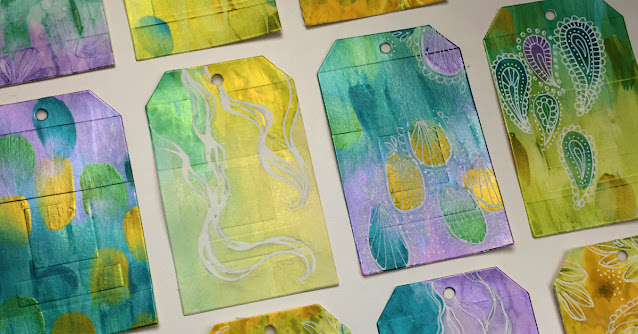
10. Stencil Technique sample: Doodle on just selected areas of the raised pattern created by the stencil.


13. Completed samples of the Water Blend Technique: Doodle thick and thin lines that exaggerate the flow of the paint.

ASSEMBLING TAGS


COMPLETED TAGS

I hope you enjoyed these multi media / doodling Zip Gift Tag projects. For more inspiration, visit i-crafter.com. Happy crafting!
Lynda Kanase
i-crafter
This comment has been removed by the author.
ReplyDeleteI love Changesets The platform is intuitive, visually appealing, and highly responsive. It streamlines workflows effortlessly, making updates and task management simple. The team clearly prioritized user experience, and it shows in every detail of the website.
ReplyDeleteBloatbox consistently provides a high-quality browsing experience. The website is well-organized, visually appealing, and easy to navigate. I appreciate the thoughtful design, valuable content, and smooth performance that make visiting the site both enjoyable and productive.
ReplyDeleteExploring Grounding DINO is both fun and educational. The website is thoughtfully designed, responsive, and provides powerful AI tools. The tutorials and examples make complex concepts approachable, turning experimentation into an enjoyable learning experience.
ReplyDeletedownloadstoryigpribadi is very helpful for saving Instagram stories.
ReplyDeleteIt’s fast, simple, and easy to use.
I really like using downloadstoryigpribadi.https://downloadstoryigpribadi.id/
Calculator is a basic and important tool for everyone.
ReplyDeleteIt helps solve math problems quickly.
I use Calculator almost every day.https://snowdayaicalculator.com/snow-day-predictor/
sassacheckstatus.web.za appears to be a third-party website that claims to help users check their SASSA grant status online.https://sassacheckstatus.web.za/
ReplyDeletesrdstatuscheckonline is a third-party website that provides information and tools to check the SASSA SRD grant application status online https://srdstatuscheckonline.co.za/sassa-srd-r370-grant-declined-status-causes-and-solutions//
ReplyDeleteZielobof https://zieloboff.com/ is a game that offers players an interactive and engaging experience through its unique concept and gameplay. It may include challenges, levels, or missions that keep users entertained and motivated to progress. Overall, it is designed to provide fun, creativity, and a sense of achievement for its players.
ReplyDelete