This blog post is about getting more familiar with the Cricut basics. Any new Cricut Crafters out there, this is for you! Here to help supply the necessary information to get your Cricut creativity flowing. Some of you pros may not need this step-by-step but might know a newbie who could use it.
Now, let's get into it!
For today's project you will need:
- Cricut Machine of your choice (we're using a Cricut Maker)
- Adhesive Vinyl
- Transfer Tape
- A wooden plank plaque
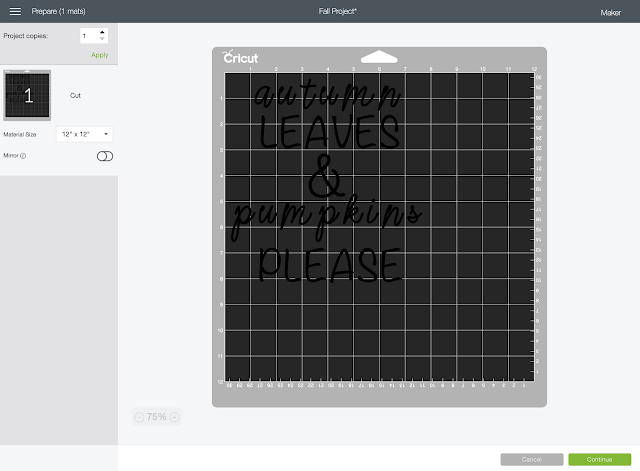
Now that your machine and Design Space app are ready to go, this is what you should see...
From there, you can start customizing! The side bar on the left will be your best friend. It's where you can add your text, images, get a template to help you see where to place your design, etc. In this case, the only elements needed were text and images.
(Some features may have an additional cost. There is an option to purchase a monthly Cricut subscription. Please see Cricut.com for more details.)
Once you have the text added and to the width your project requires (please refer to the rulers on the top and side), you can weld it all together so when it cuts, it will look exactly as it does on your screen. Select each text box (this can be done by holding shift and clicking on each of the boxes until they are all highlighted) and the weld button is located near the bottom right of the screen. By not welding, you may be able to conserve vinyl, but you'll have to manually line up your text.
When everything is welded, click "Make It".
Hit continue and it will connect to your Cricut machine. It's important to select the type of vinyl you are using (if you're using an Explore, make sure your dial is turned to the correct material.) This helps your machine know how to cut the material. After selecting your type of material (in this case it was Premium Vinyl) you should change the default setting to "More". This insures that the blade will go deep enough to where your design will come off the backing cleanly. Line your vinyl up the the cutting mat (shop through cutting mats here: https://bit.ly/2FO34yl) and press it down straight and smooth out any bubbles with a credit card or tool. The Cricut Light Grip mat was used in this project.
Insert the cutting mat with the material into your Cricut, making sure the mat is touching the rubber wheels. The button that has the arrows should now be blinking. Click that, to load your mat. Push the and your machine will start doing its magic.
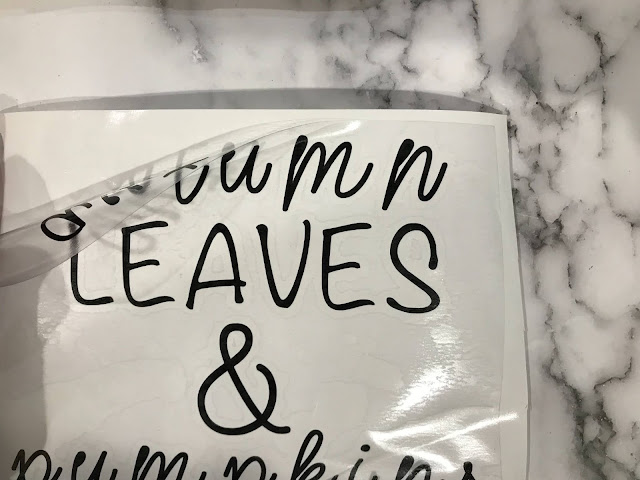
Remove vinyl from cutting mat and proceed to take off the access material as shown in the picture below. It is also important to take out the small pieces that may be left behind. This is called "weeding." As you can see the inside of the "a" needs to be removed. It's all in the details!
To keep the text in the same position, Transfer Tape is very important! Cut out the length and width of your design and stick it right on top. Press down hard for about 30 seconds to ensure that all the letters will come up when you go to take it off. It should all come up on the clear tape and from there you can apply to the desired surface. Even if a letter gets left behind don't panic, just lay the tape back down carefully and continue to press down to secure it. If it's being stubborn, use a credit card or tool to rub over it. Then just line up the design to your surface and push down. Remove the tape and you've officially made your first Cricut Project!
Decide you want to add a little something else? That's super easy! You simply go back to your design, fit it in according to your text and then remove the already added text so you don't waste any material.
And you should end up with something like this...
You made it to the end! We know it may feel like a lot reading all the steps involved but it really does fly by once you get the hang of it. Just refer back to this blog when you need to.
Be sure to add #SupplyingCreativity in your Instagram caption. We would love to see your Cricut creations. Use hashtag #CricutMade and your project might get featured on Cricut's official Instagram. Happy crafting!


Thank you for building such excellence, segoeui.com offers high-quality font information through an intuitive layout and practical guidance. The website supports creativity while ensuring visitors enjoy a productive and satisfying browsing experience every time.
ReplyDeleteI greatly admire this inspiring platform, medievalfont.com for presenting typography resources in a professional and engaging manner. The website encourages creativity while providing valuable information for designers, learners, and font enthusiasts alike.
ReplyDeleteGreat respect for this excellent platform, alexbrushfont.com presents premium typography resources with reliable information and outstanding usability. The thoughtful organization makes it easier for visitors to find attractive fonts for every creative purpose.
ReplyDelete