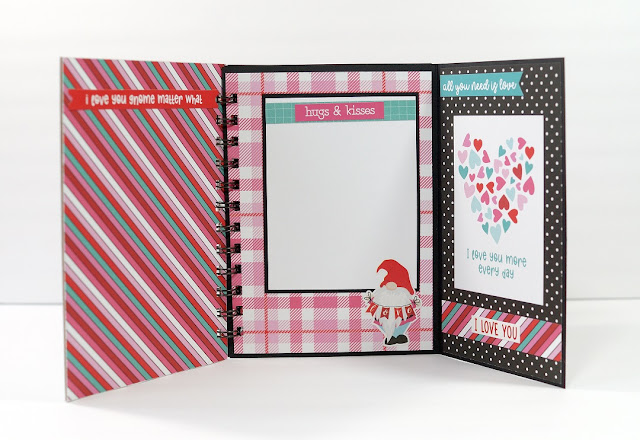
Tulla & Norbert’s Love Story Album
It's time to start getting serious about Valentine's Day and we've got you covered with the help from Xyron and PhotoPlay Paper. Get ready for the perfect Valentine's Day album designed by Sue Eldred!
Materials Used:
- PhotoPlay™ Tulla & Norbert’s Love Story Collection Pack
- PhotoPlay™ Tulla & Norbert’s Love Story Cardstock Ephemera
- Xyron Creative Station®
- Xyron® 9” Permanent Adhesive Refill for Creative Station
- Xyron® Tape Runner
- Xyron® 3” Disposable Sticker Maker
- Xyron® Adhesive Eraser
- Mat Board or Chipboard
- Rotary Cutter
- Binding Machine
- ¾” Binding Coils
- Cardstock: Black, White
- Paper Cutter
- Scoreboard and Bone Folder
- 1” Circle Punch
- 1/8” Hole Punch
- Red and White Twine
- Turquoise Ribbon
- White Thread and Small Red Button
- Scissors
Directions:
- For the cover, cut the matboard into two 5” x 7” pieces.
- Cut two 5” x 7” pieces of black dot scrapbook paper and two 5” x 7” pieces of diagonal stripe paper.
- Place the scrapbook paper into the Xyron Creative Station design side up. Turn the handle to run the scrapbook paper through the machine. As the scrapbook paper goes through the Xyron Creative Station, it adds a complete layer of edge-t-edge adhesive to the back of the scrapbook paper. (You will need to add adhesive to all four pieces of scrapbook paper.)
- Remove the clear protective coating. Peel the paper from the white backing and stick it directly onto the matboard. Each piece of the matboard will have black dots on one side and diagonal stripes on the other.
- The Black Dot Scrapbook paper will be on the front and back cover with the diagonal stripe paper on the inside.
- Cut two 1 ½” x 7” strips of diagonal striped paper. Run the strips through the Xyron Creative Station to add adhesive to the back.
- Stick onto the edge of the front and back cover. Pay special attention to the placement on the back cover so that the pieces line up on the right side.

- For the inside pages, cut six 5” x 7” pieces of black cardstock.
- Cut two 9¼” x 7” pieces of black cardstock. Score these pieces of cardstock at 5” lengthwise to create a page that has a flap.
- Adhere a variety of Tulla & Norbert Love Story scrapbook paper onto the front and back of each section of the black cardstock using the Xyron Tape Runner.
- Using a binding machine, bind the album together.
- Cut apart the 3” x 4” journaling cards to adorn the front cover and some of the inside pages.
- A great way to add adhesive to the Tulla & Norbert’s Love Story Ephemera is to place them into the 3” Xyron Disposable Sticker Maker. Just pull, rub, peel and stick. To remove any excess adhesive around the die-cut pieces, use the Xyron Adhesive Eraser.
- Create fun page flaps and pockets to add your album using stickers, die-cuts, ribbon, and twine. Add those special photos and give this mini album as a lovely Valentine’s Day gift.
Fun Tip: Add dimension to your album. Run a 1” x 1” square piece of craft foam though your Xyron 3” Disposable Sticker Maker, then turn the foam sticker upside down and run though again. Now you have made your own double-sided foam sticker. Add to the back of the “love you” round circle and place on the front of your mini album.
.
.
.
To find out more about the Creative Station, watch this video below!
We would love to see your finished product. Share with us on Instagram and include #supplyingcreativity so we can check it out!
Want to keep up to date with New Products, Trends and Notions News? Follow us on Social Media! What's New Videos, Product Releases, DIY's and more! Our social media feeds are always packed with fresh new content displaying your favorite brands!
Subscribe to our Youtube channel! https://www.youtube.com/c/NotionsMarketingCorp
Follow us on:
Instagram: https://www.instagram.com/notionsmarketing
Pinterest: https://www.pinterest.com/notionsmkting/


LOVE, LOVE, LOVE this project!
ReplyDelete