
Hot Cocoa Bombs are SO trendy right now! These giftable treats bring the perfect amount of "wow factor" to teacher gifts, holiday cookie exchanges, gift baskets and stocking stuffers! Pouring hot milk over one of these is sure to bring a little Christmas Magic to your little one's Christmas morning (or even your inner child, whenever you want.)
We did quite a bit of trial and error in learning to make these bombs with what we had on hand, and can safely say the easiest way is to use silicone dome molds. They release the chocolate the easiest without too much cracking/breaking. They were a little hard to find, so in the meantime there are a couple other options for creating that perfect, hollow shell of chocolate!

To do this project you're going to need these materials:
- Chocolate Molds
- Dome lids
- Silicone Dome Molds
- Chocolate melts & tools
- Chocolate Pro Fountain & Fondue Wafers by Wilton
- Cocoa
- Sprinkles
- Fun Additions!
- Marshmallows
The Disposable Dome Lid Method
We tried using disposable dome lids (the kind that don't have a hole in them). This method seemed to work just fine! Because you can cut and "reseal" the plastic with tape, you can peel off the "mold" without cracking your chocolate shell too much! Also, because of the flat part at the top, these wont roll away from you when you're decorating them. Bonus!
Step 1: Melt your chocolate wafers according to the instructions. The nice thing about the ones we used was that it didn't require tempering. To melt them evenly, use a double boiler or just a pot of water and a glass bowl. Boil the water in the pot, and when it has boiled, remove from heat and put the bowl or melter pot on top. The wafers will melt fairly quickly, just keep stirring them slowly (do not whip the chocolate.) The melted chocolate will stay liquid for a while. Let it cool a bit and just re-stir to keep it smooth.
Step 2: Meanwhile, take your disposable lids and make four cuts, pictured below. This will make petals, so you can peel the plastic like a banana.

Take some tape and re-seal the cuts. Tip: Fold over the tape to leave yourself a pull-tab to easily remove the tape when the chocolate has cooled.
Step 3: Pour your slightly cooled chocolate and rotate the lid to completely coat the inside with a thick layer of chocolate. Keep rotating until the chocolate doesn't run anymore.
Step 4: Place face down on a cookie sheet with parchment paper and pop in the freezer for a few minutes. You'll know it's ready to come out when you can see pockets of air between the plastic and the chocolate (as the warm chocolate cools/freezes, it'll contract away from the plastic. Science!)

Step 5: Once the chocolate has hardened, remove the tape and peel the plastic "petals" away from the shell. Congratulations! You have half a chocolate shell! Be careful not to handle the shells too much, as the heat from your hands will melt the chocolate and leave fingerprints.
If the chocolate seems to be too thin to withstand removing from the mold, repeat steps 3 and 4 until you get a thick enough shell.
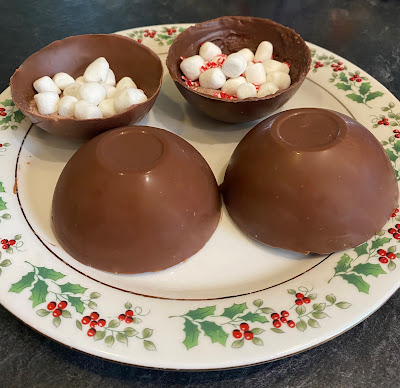
Step 6: Fill the bottom shell of your bombs with whatever fillings you want! This could be marshmallows and sprinkles, but whatever you want to add! Personally, I think the Snowman cocoa trimmings would be adorable to pop out of one of these bombs.
The hot cocoa powder inside is optional: If you're going to be putting your bomb in a bigger mug with more milk, the additional chocolate is great! In a smaller mug, it makes a VERY rich cup of cocoa.
Step 7: Pour boiling water onto a plate to heat it up. Once the plate is warm, pour off the water and dry it. Place your empty chocolate shell face down on it to melt the edge and immediately apply to the filled bottom half. If it doesn't adhere, you can put more chocolate on the plate and roll the seam along the chocolate, or pipe some of the remaining liquid chocolate onto the edge and "glue" the shells together.

Step 8: You could stop here, but if these are gifts, make them fancier! Use candy melts to pipe decoration onto your bomb and add more sprinkles!


Step 9: Place your finished bomb in your mug, and get your candy spoon or candy cane ready to stir!


Step 9: Pour hot milk over it and watch the magic happen!
The Christmas Ornament Method
We've seen several blogs using the Christmas ornament method. To do this, we recommend using tempered chocolate rather than the candy melts. The harder, tempered chocolate will withstand the extra pressure needed to pop the shell out of the ornament half.
Step 1: Much like the disposable dome method, you'll have to melt/temper your chocolate.
Step 2: Prepare your ornament halves by first washing them, then lightly coating the inside with oil.
Step 3-4: Same as the above tutorial. I used a baking rack to avoid the chocolate pooling on the cookie sheet.

Step 5: Gently remove the chocolate from the ornament half.

Step 6-10: Same as above!
We hope you enjoy this fun holiday craft! Share your creations with us on Social Media, both successes and failures! Even the ones that don't work out are tasty. :)
Outstanding effort has clearly made floorpbrowser.org an exceptional online platform today. The website delivers consistent speed, reliable functionality, and smooth navigation throughout every session. I genuinely admire the quality and professionalism demonstrated in every aspect of its design.
ReplyDeleteCompletely satisfied after spending valuable time objviewer.org exceeded my expectations completely. The platform offers excellent speed, smooth performance, and an attractive interface. It provides a hassle-free experience for viewing OBJ files with remarkable consistency and reliability.
ReplyDeleteCould not be happier after trying this platform mboxviewer.org for viewing MBOX email files efficiently. Everything performs perfectly, navigation remains effortless, and the website offers dependable functionality that simplifies email archive management for users of every experience level.
ReplyDelete